

Saturday, December 31, 2011
Clean & Simple Stampin' (#171)
This card is for the current sketch challenge over at Clean & Simple Stamping. I had to make a birthday card for my talented, crafty friend Jess and needed some inspiration so this was the perfect sketch to get me going. I just went to my LSS over this past week and bought a bunch of Valentine paper & accessories so I just had to break into it a little for Jess's card. I'm a bit burnt out from making Christmas cards so I wanted to do something totally different and girly and pink. I got to use my new October Afternoon Sprinklers on this which makes me far too excited (I used the Sprinklers on the graph paper in the background)! I decided to stick with the sketch and use a square layout which I don't do very often. I'm going over to Jess's house tonight for a NYE party so I hope she doesn't see this post before I give her the card!

Friday, December 30, 2011
CAS'in #33
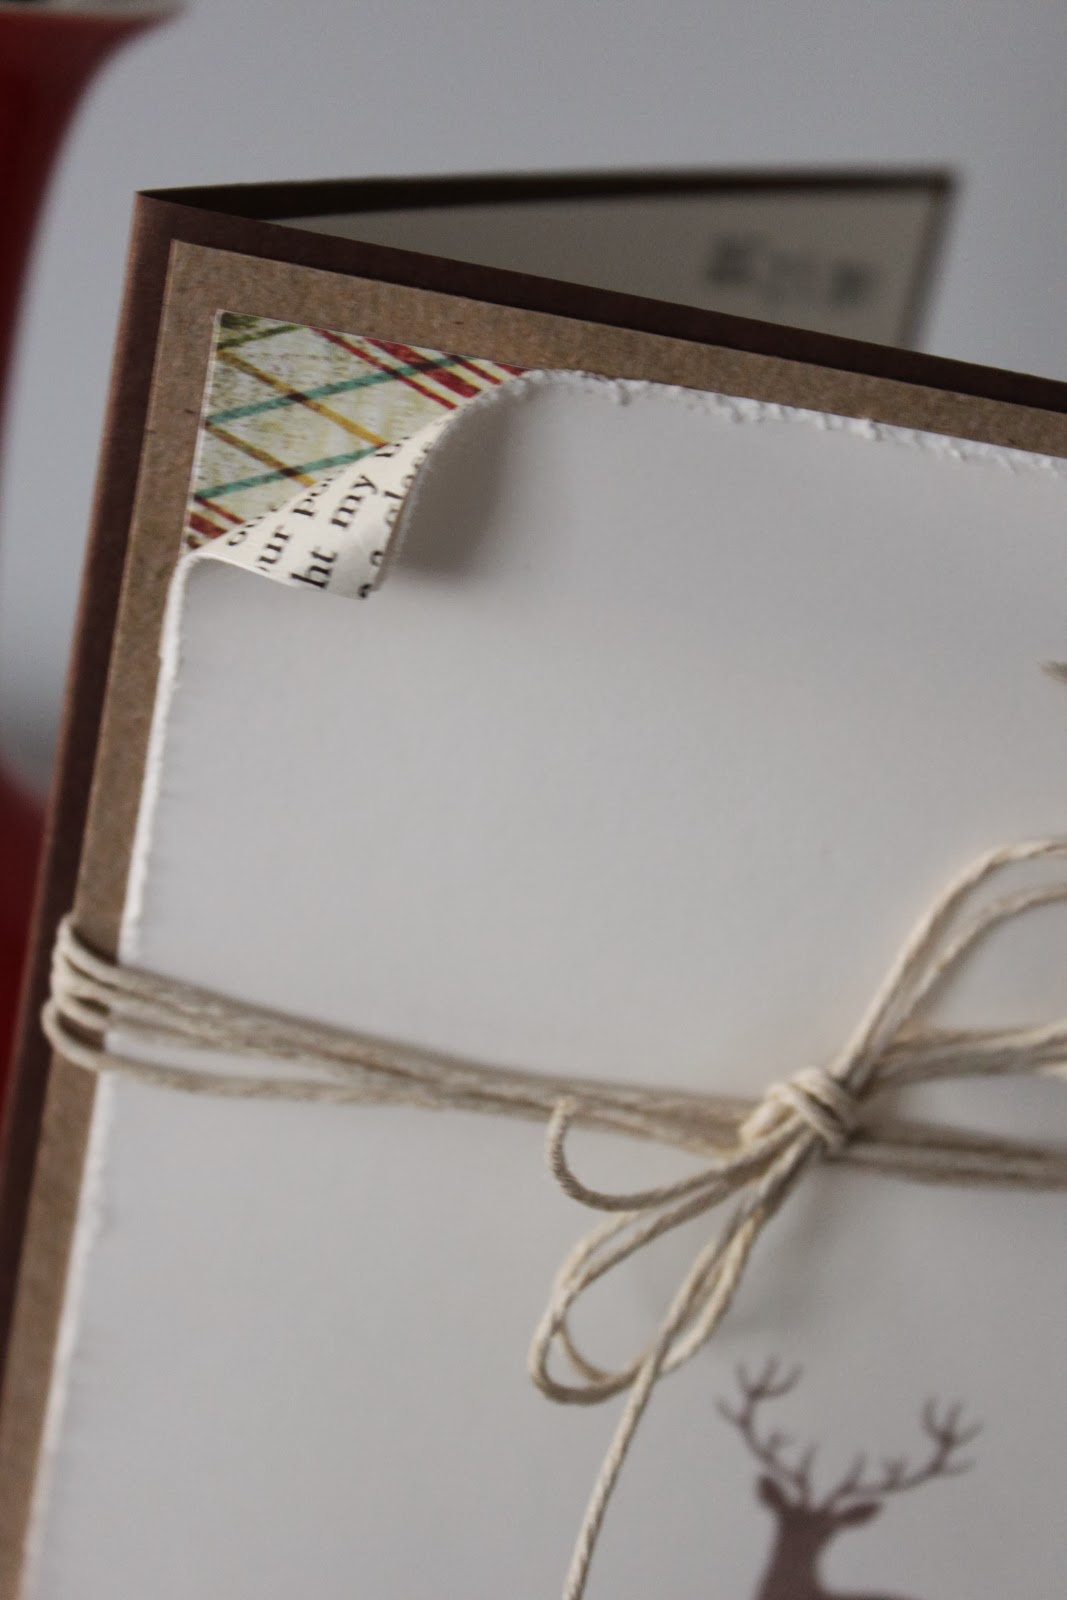
This week's CAS-ual Friday challenge is to create a clean and simple project using kraft & twine so I am going to share one last Christmas card! I wanted to keep it simple so that it appeared masculine since I planned to give this card to my dad. I used a vintage book for the corner turn up and I distressed the edges with some scissors and then wrapped a whole buncha' twine around the whole thing.


Sidewalkin'
Here is a birthday card that I made for my friend Lora using the new October Afternoon line - Sidewalks. I love this line, it's so fun! For this card, I just sewed the border around the edge of the flowered paper with my sewing machine and then layered it up on some kraft cardstock. After that I used my bloom builders and a brad to make the layered flower, added some twine and then added a banner & sentiment.


Tuesday, December 20, 2011
Sweetenin' up Christmas
This card was made with the Papertrey Ink Friendship Jar & Holiday Fillers. I just love this set, it's so fun and it's easy to make it 2 dimensional. I made this one similar to the hydrangea cards I've posted in the past. I used several copic markers to color the candy canes & the jar and then added some red sparkle stickles to the canes & glossy accents to give it the jar look; after all of that dried I added the twine & tag and then layered it up with some colorful cardstock.
The candy shown in the photo was made by my neighbor, it is sooooo good. In addition to the yummy chocolate peppermint bark, he also made some chocolate with bacon in it. It is as awesome as it sounds. I've already eaten all of it!


The candy shown in the photo was made by my neighbor, it is sooooo good. In addition to the yummy chocolate peppermint bark, he also made some chocolate with bacon in it. It is as awesome as it sounds. I've already eaten all of it!


Monday, December 19, 2011
Decoratin'
One of my favorite blogs to read is Dawn McVey's; I just love her style and she always has great ideas! As I was reading her blog last week I saw how she decorated a pandora gift box and I thought it was just so clever that I had to try it myself. My sister-in-law asked for some Pandora charms for Christmas, so I just happened to have a Pandora gift box to decorate for her.


Sunday, December 18, 2011
Twistin' for 6 more months!
So I have been asked to stay on the Design Team over at Twisted Sketches for the next 6 months! I'm excited to be part of the Twisted team and can't want for the new sketches starting in January! Here is my take on the DT card sketch with the "number" twist. I made this card for my niece who just turned 9 years old. Head over to Twisted to check out the sketch and the rest of the DT's cards.


Craftin' Away
For more Christmas card inspiration, I stumbled upon the Cardabilities Challenge site and loved this week's sketch! I used it to make a few cards for family members. I also thought it'd be fun to add one of our nutcrackers into the picture to make it a little more holiday themed.
This card also fits into the color challenge over at Just Us Girls. The color challenge this week was to make a card using red, olive & white/kraft which was easy because I've been making Christmas cards all day!

This card also fits into the color challenge over at Just Us Girls. The color challenge this week was to make a card using red, olive & white/kraft which was easy because I've been making Christmas cards all day!

Playin' #111 & LIM'in #46
I am in a full out Christmas card & tag making mood, which is good because I really haven't started until today (whoopsie!). For inspiration to get started, I went to the challenge blogs! I loved both the Play Date Cafe & Less Is More challenges this week so I decided to combine them into one card! The PDCC this week was to use black & white with a splash of teal/aqua and the LIM challenge this week was to incorporate music into your card. I used a music note stamp that I've had but haven't really used much and stamped a piece of plain white cardstock, trimmed the edges and then just layered it with black & aqua cardstock. After that I just stamped the "Merry Christmas" sentiment and added a folded ribbon which I assembled with some hot glue and then added an aqua stone brad.


Sunday, December 11, 2011
Celebratin'
One of my friends asked me to make an anniversary card for her to send to her brother & sister-in-law. I know that she loved a previous card that I made with my summer friendship jar stamps, so I recreated it with a Mr. & Mrs. sentiment.

At the same time, I had came up with another card that I had been wanting to make with the Mega Mehndi Medallions set that I have, I ended up loving how this came out. The center circle was a happy accident. I was using a piece of scrap from a previous mehndi stamp that didn't come out well and I turned it over and a portion of the mehndi medallion was on the circle and I decided that I really liked how that looked so I ran with it.
 I have to apologize for my photo quality in the last few posts. I haven't been able to photograph in natural light lately due to my schedule.

At the same time, I had came up with another card that I had been wanting to make with the Mega Mehndi Medallions set that I have, I ended up loving how this came out. The center circle was a happy accident. I was using a piece of scrap from a previous mehndi stamp that didn't come out well and I turned it over and a portion of the mehndi medallion was on the circle and I decided that I really liked how that looked so I ran with it.

Sunday, November 27, 2011
Twistin' #87
Here is my take on this week's Twisted Sketches challenge, where the twist this week was Glitter! Glitter is so fun and I had a great time making this fun Holiday card. Head over to Twisted to try the sketch out for yourself!


Sunday, November 13, 2011
CAS'in #28
One more challenge post for you today - CAS-ual Fridays challenge this week was to make a tag or a card with a tag on it. I bought a few new dies this past weekend and thought it was a perfect time to try them out. I used some double sided sticky paper for the snowflake. I cut a small square out of the sticky paper and adhered one side to some ivory cardstock. I then ran it through my Cuddlebug with the new snowflake die, and had to run it through about 15 times before it cut through. Once I finally got it cut through, I peeled the other side off and added the glitter. I love how it came out, it's so sparkly and pretty. After that I just used an ornament shaped die to create the tag and then heat embossed a 'to' & 'from' on the back.


LIM'in #41
This week's challenge over at Less Is More is to create a one layer card using "Leaves" as the theme of the card. One layer cards can be so challenging because I keep wanting to add layers of paper! However, once I complete a one layer card, I always love how it looks because it's just so simple and clean looking. I love challenges like these because they push me to do something different. For this card, I just scored a border around the edge of my cardstock and then heat embossed a leaf with some gold embossing powder. After that was done, I just thought it would make a great Thanksgiving card for someone so I added the sentiment using a rich cocoa ink.


PDCC'in #107
As soon as I saw this mustache paper in my local scrapbooking store, I knew I had to have it so I could make my dad a birthday card with it. My dad has had a mustache since his teen years so it just seemed so fitting. This week's challenge over at the Play Date Cafe was to create a card using black, white and a splash of orange. It was a fun card to make, I can't wait for him to see it at the end of the month.


Saturday, November 5, 2011
Clean & Simple Stampin' (#165) & PDCC 106
Here is one more challenge card to share with you all. I am submitting it for the Clean & Simple Stamping challenge and the Play Date Cafe Challenge this week. The C&S challenge was to use the provided sketch to create a C&S card, this isn't the simplest of cards but I love the sketch and wanted to submit it anyway. The Play Date Cafe Challenge was to use the colors gray, pink and yellow. I immediately thought of the Authentique paper pad I have because the whole pad is those 3 colors! I finally got to use my PTI bloom builders die on this card and then I just colored some rhinestones with my Copic Y38 marker.


LIM'in #40
I'm back with some challenge cards! I have had zero time lately to participate in the online challenges, but today I managed to find 2 hours to make some cards for a few challenges. The first card is for Less is More and Cas-ual Fridays. The Less is More challenge was to use the colors red & orange and the Cas-ual Fridays challenge was over the edge, so something had to hang over the edge of the card. This was a quick, clean, simple card to make. Looking forward to doing more challenges on these blogs in the future!


Saturday, October 29, 2011
Twistin' #83
Here is my take on Twisted Sketch #83 - this week's twist was "Black" any how, any way! Go over to the Twisted Sketches website and try out the sketch for yourself!


Wednesday, October 26, 2011
Taggin' it
These fun bottle tags are making their way over to re:Discover this week! I am in love with this die and I know I am going to use it a lot all year round. I feel like I'm always giving wine as gifts (who doesn't love that??), so instead of putting it in a bag I can make a fun, personalized tag for the recipient!


Sunday, October 23, 2011
Twistin' #81
Here is my take on Twisted Sketch #81, the twist for this sketch was "Love". I have been wanting to make a Christmas-y kind of card lately, especially since I need to get some Christmas stock over to re:Discover since Santa is going to be there next weekend! So I decided to use a "Peace, Love, Joy" stamp in the background of the snowman as my twist. I just picked this Tim Holtz Snowman die up from Michael's last week, I was super excited to put it to use! Check out the other designer's work over at Twisted Sketches and try it for yourself!


Twistin' #79
Here is my take on Sketch #79 over at Twisted Sketches! The twist for this sketch was "felt". I used my PTI Cupcake die to cut out the felt for the top of the cupcake. I made this birthday card for my friend, Ashley. She is a fellow crafter so it felt special to create something a little different for her. I used some liquid pearls & rhinestones on top of the felt to make it look like fancy sprinkles. Check out the rest of the Design Team's work over at Twisted Sketches and try it out for yourself!


Twistin' #77
I can't believe it has been over a month since my last blog update; the last 2 months have flown by! Mark and I have been traveling every weekend for what feels like forever and now that the weather is cooling down so are our schedules which leaves me with more time to craft on the weekends. I put in a PTI order last weekend for some holiday stamps & dies and I can't wait until it shows up this week so I can get to work on some Christmas stock for re:Discover. In the meantime, I am going to post the Twisted Sketches that I have done for the last few weeks. Head over to Twisted Sketches to check everyone's work out and submit your own take on the sketch!
This is my take on Sketch #77 - the twist was "plain". The twist worked out perfectly for this card since this was made for my father-in-law and I don't have a lot of masculine stamps. Keeping it simple ended up keeping me from making it look girly.

This is my take on Sketch #77 - the twist was "plain". The twist worked out perfectly for this card since this was made for my father-in-law and I don't have a lot of masculine stamps. Keeping it simple ended up keeping me from making it look girly.

Wednesday, September 14, 2011
Pinnin' it
I made this card for a wedding reception that Mark and I are going to this upcoming weekend. The bride & groom were married in Oregon a few weekends ago and they are coming to Maine to have a reception with friends & family located in New England, so we are taking the drive up to visit with my in-laws and to attend the wedding reception. The wedding colors were brown and coral so I wanted to incorporate that into this card. I used a flower die and felt to create the base of the embellishment and then just glued a pearl onto a button and added that. To top it all off I reallllyyyy wanted to use these new stick pins with the silhouette on them that I picked up at Right at Home, I thought it helped to tie in the bridal feel. One other fun detail on this card is that I used the mehndi medallion impression plate to jazz up the ivory paper that I stamped the sentiment on. Enjoy!


Wednesday, September 7, 2011
Twistin' #75
I know I'm a little late posting this card, but I've been away for the long weekend and forgot to schedule my post! Anywho, I made this card for my dear friends, Lora & Dan, who just bought their first home together. I used this week's Twisted Sketch challenge of using ink with the sketch provided. I used Memento ink in Rich Cocoa to stamp the "Congratulations" sentiment, and used VersaMark & Embossing power to stamp the white "Congratulations" sentiment.
One of the fun things about this card are the buttons! They are from an old button factory in Connecticut, I picked up a string of them from re:Discover, what a great little find. The anchor one I already had and thought it was perfect to use since their new home is in Rhode Island (the Ocean State) and an anchor is on our state flag.


 One more little secret about this card is that all the paper was pulled out of my scrap box! I love when that happens.
One of the fun things about this card are the buttons! They are from an old button factory in Connecticut, I picked up a string of them from re:Discover, what a great little find. The anchor one I already had and thought it was perfect to use since their new home is in Rhode Island (the Ocean State) and an anchor is on our state flag.


Saturday, August 20, 2011
Twistin' #73
Here is my take on this week's Twisted sketch. This week the twist was "handmade" and although the card is handmade, I thought I'd add some rolled flowers that I did by hand to the front of this card. My college roommate, Margaret, is getting married this Sunday and I knew I had to make her a fun, special card. Her wedding colors are pinks, greys and greens so I tried to incorporate all of that into my card. I also distressed the edges of the green paper in the background to make it look a little more vintage. I couldn't seem to stop adding rhinestones - and I justified it because it's a wedding so it needed some bling*
I'm really happy with how this one came out, hope you enjoy!


I'm really happy with how this one came out, hope you enjoy!


Friday, August 12, 2011
Copic Colorin'
I just love summer and the flowers it brings! Hydrangeas are one of my favorite summer flowers, so when I found these vintage, aqua, ball jars at RE:discover the first thing I thought of was filling them with pretty flowers. I took this inspiration photo in my back yard with hydrangeas from a bush we have in the yard. I got really excited about it because I knew I had the Friendship Jar Summer Fillers from PTI that has a hydrangea stamp. Then I got even more excited because I knew I could use it as an excuse to practice my copic coloring, yay!
Here is the inspiration photo for the hydrangea card I made below.

Here is the card that I made:


I would definitely change a few things about this card next time around. For instance, I don't love the way the white around the edges looks, I got a little carried away with this one....But overall I'm happy with the coloring and I used glossy accents for the first time ever. I applied it over the jar so it would look more like glass. I also used some liquid pearls in the center of each flower.
This card took me so much longer than most of the other ones I've made, but I really loved making it and am planning to make some more! I dropped this card off to RE:discover so it is for sale there right now!
Saturday, August 6, 2011
Twistin' it up!
Hello Blog Friends! I have some more exciting news! I have been selected to be on the Design Team (DT) for Twisted Sketches!! I am so excited to be a part of this challenge site! The deets of my time with Twisted Sketches are that I make a card every other week based on the sketch provided to me. My card is then published with the rest of the team cards to use as inspiration for other card makers to submit a card for the challenge. So this week's twist was Edge, and I am allowed to interpret that any way I want. I decided to bring my ribbon banners to the edge of the paper and also use an edger die to make the scalloped edge for the card on the right side.
Here is my take on the sketch & twist:


Can't wait to see your submissions!!
Here is my take on the sketch & twist:


Can't wait to see your submissions!!
Thursday, August 4, 2011
LIM'in (#26)
I figured I would give the Less is More blog challenge another try. This week's challenge was "Feeling Fruity" where you had to use fruit on your card or fruit colors. As soon as I read the challenge I knew I had to use my apple or pear sets that I got from PTI a few months ago. I have been wanting to use them on something but haven't yet so this was the perfect opportunity! Since this is a clean & simple site, you have to keep the embellishments & layers to a minimum and keep a lot of white space. I like this type of card making, it makes everything seem crisp and clean. This card didn't take me too much time to make. I used the rock & roll technique with the apple stamp to give it a little more depth and I couldn't resist using some sparkly fluff on the leaf. Oh, how I love sparkly fluff. After that I just stamped the coordinating sentiment and voila!


Saturday, July 30, 2011
Bookmarkin'
In addition to the cards that I am selling at re:Discover, I am also selling bookmarks! Here are a couple photos of one of my bookmarks that is currently in the store. I die-cut 2 different papers from Cosmo Cricket's Odds & Ends line and adhered them together so both sides of the bookmark would be different. I added an October Afternoon rub-on that reads "Here's the Story...". I just thought it was so perfect for a bookmark. After that I added a green silk ribbon and reinforcing to the hole at the top and voila! Any guesses on which book I used?? :)


Friday, July 29, 2011
Organizin'
I took advantage of having the week off by organizing areas of my house that I have been neglecting for a while (basement & craft room). I couldn't wait to purge all of the old and to organize all of my supplies! I went out and bought a label maker, serious business. Here are some pics of my "new" craft supply closet. Next up, closet doors! I'll be spending tomorrow afternoon painting the doors so my hubs can hang them this weekend.


Thursday, July 28, 2011
Thinkin' of You
I made this card this morning and tried my hand at using felt for the first time. I'm totally hooked. I love how it adds a different texture to the card. It took a few times to get the vines in the back ground right, they are a bit difficult to get them perfectly straight. I cut them out using the new PTI vine border that I got at Stamp-A-Faire.


Subscribe to:
Posts (Atom)